Setting up a purchase event in Google Analytics 4 (GA4) is essential for tracking online sales and analyzing customer behavior. This guide explains how to configure the event using Google Tag Manager (GTM) to ensure accurate data collection. Key points include:
- What is a GA4 Purchase Event?: It logs completed transactions with details like transaction IDs, revenue, and product data. GA4 automatically flags it as a key event.
- Why Track Purchase Events?: It links sales data to marketing efforts, identifies customer journey obstacles, and enables targeted remarketing.
- Prerequisites: You’ll need a GA4 property, GTM or gtag.js, Editor-level permissions, and access to your website's data layer or platform integrations.
- Setup Process: Steps include enabling Enhanced Ecommerce, configuring GA4 tags in GTM, defining data layer variables, and creating a purchase event tag with appropriate triggers.
- Testing: Use GTM Preview Mode, DebugView in GA4, and Real-Time reports to validate your setup and ensure data accuracy.
This setup helps connect marketing efforts to revenue and provides insights into customer behavior, enabling data-driven decisions for e-commerce success.
How To Setup Ecommerce Tracking For GA4 (Google Analytics 4)
sbb-itb-5174ba0
Prerequisites for GA4 Purchase Event Setup
To set up your purchase event in GA4, you'll need the proper website analytics tools, permissions, and configurations in place. Skipping any step can lead to delays or incomplete data collection.
Required Tools and Accounts
First, make sure you have a GA4 property connected to an active web data stream. You'll also need either the Google tag (gtag.js) installed on your site or a Google Tag Manager (GTM) container. GTM is often the better choice because it lets you manage event tags and triggers without altering your website's code repeatedly.
You'll need Editor-level permissions or higher in Google Analytics to configure settings and access debug data. If you're tracking purchases through a mobile app, ensure the Google Analytics for Firebase SDK is installed.
For implementation, you’ll need access to your website's source code or administrative access to ecommerce platforms like Shopify or WooCommerce if you're using their built-in integrations. Once you have these tools and permissions ready, you can move on to verifying your GA4 property settings.
GA4 Property Configuration
Before setting up your purchase event, confirm that your GA4 property is configured correctly. It should already be created and linked to your website through a web data stream. After sending purchase events, the data will typically appear within 24–48 hours in GA4 reports.
One key detail to note: the purchase event requires a transaction_id. This prevents Google Analytics from counting duplicate events, ensuring accurate revenue data even if a customer refreshes the order confirmation page. This step is vital for accurate tracking and sets the purchase event apart from other GA4 events. Next, ensure your website’s data layer is properly set up.
Website Data Layer Access
The data layer acts as a bridge between your website's backend and GTM, allowing transaction details to be formatted and transmitted to GA4. Without it, you won’t be able to capture dynamic data like unique transaction IDs, taxes, or shipping costs.
A functioning data layer is essential for passing required parameters like transaction_id, value, and the items array. The items array is particularly important as it enables product-level reporting in GA4, showing which products contribute to your revenue. Place the data layer code above the GTM container snippet to ensure data is available when the tag fires.
If you're using an ecommerce platform with native integrations, check its documentation. Many platforms track ecommerce events automatically, which can save you from needing manual data layer coding.
How to Set Up the GA4 Purchase Event
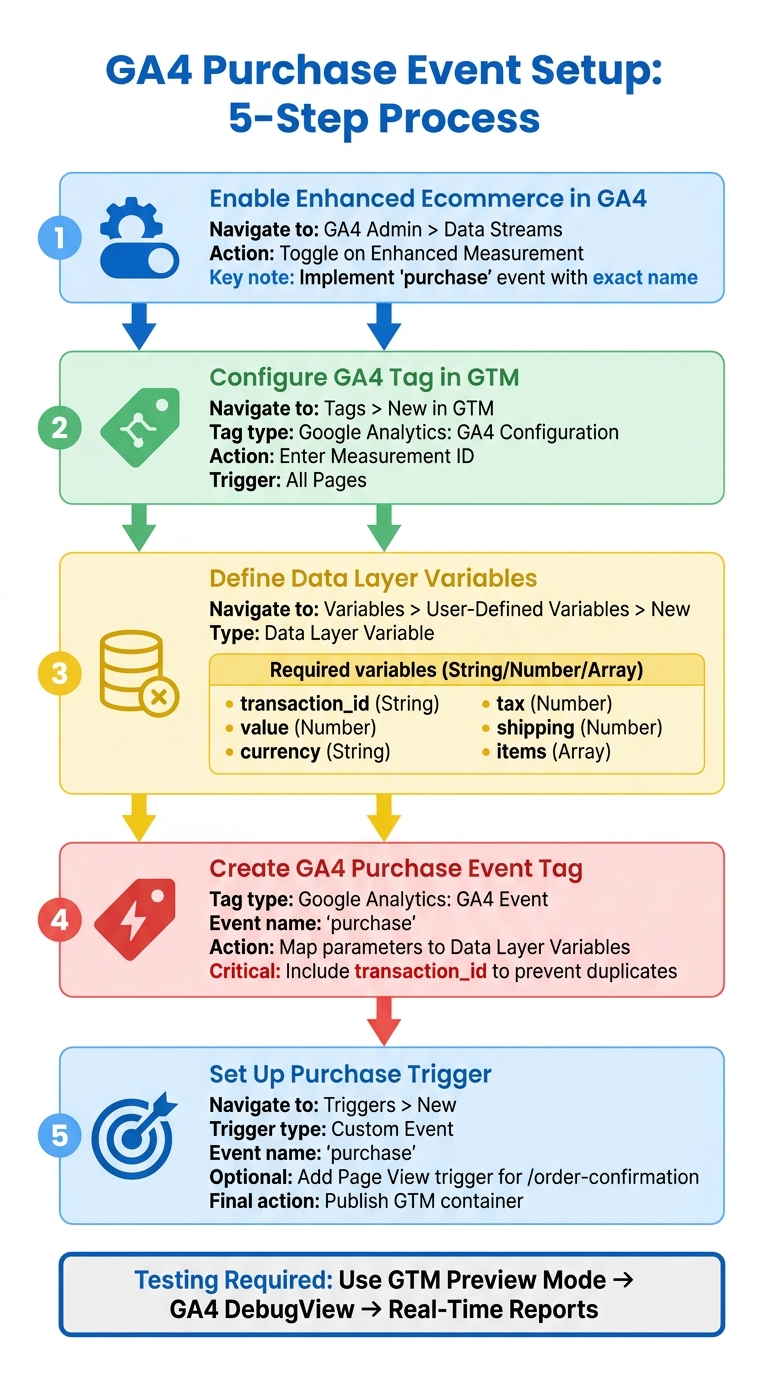
GA4 Purchase Event Setup Process: 5 Steps from Configuration to Testing
GA4 operates on an event-driven model, meaning you'll need to set up a purchase event to enable ecommerce tracking. This process primarily involves using Google Tag Manager (GTM) to create tags, variables, and triggers that work together to send purchase data to GA4.
Step 1: Enable Enhanced Ecommerce in GA4
Start by navigating to GA4 Admin > Data Streams and selecting your web stream. Make sure Enhanced Measurement is toggled on. While this feature captures basic interactions like scrolling and outbound clicks using top analytics tools for business, it doesn’t automatically track purchases.
To track purchases, you need to implement the purchase event using the exact event name recommended by GA4. This step is crucial because GA4 identifies this event as a key interaction and uses it to populate your monetization reports. There’s no separate setting to enable ecommerce tracking - it's all about correctly setting up the purchase event. Once this is done, move on to configuring your GA4 tag in GTM.
Step 2: Configure the GA4 Tag in GTM
In GTM, go to Tags > New and create a new tag. Choose Google Analytics: GA4 Configuration as the tag type. Enter your Measurement ID, which you can find under Admin > Data Streams in GA4. Set the trigger to All Pages to ensure the tag collects data site-wide. This tag serves as the link between your website and GA4, so make sure it’s active before setting up any purchase event tags. Save and label the tag clearly for easy identification.
Step 3: Define Data Layer Variables
Next, you’ll need to define variables in GTM to pull transaction data. Go to Variables > User-Defined Variables > New, and select Data Layer Variable as the type. For each transaction key, create a variable using dot notation to access nested values. For example, set up a variable named DLV - ecommerce.transaction_id with the Data Layer Variable Name ecommerce.transaction_id. Repeat this process for other keys like ecommerce.value, ecommerce.currency, ecommerce.tax, ecommerce.shipping, and ecommerce.items.
Here’s a quick reference table for setting up these variables:
| GA4 Parameter | Data Layer Variable Name | Data Type | Description |
|---|---|---|---|
transaction_id |
ecommerce.transaction_id |
String | Unique ID for the order (e.g., "T12345") |
value |
ecommerce.value |
Number | Total revenue of the purchase |
currency |
ecommerce.currency |
String | 3-letter ISO 4217 code (e.g., "USD") |
tax |
ecommerce.tax |
Number | Total tax amount |
shipping |
ecommerce.shipping |
Number | Total shipping cost |
items |
ecommerce.items |
Array | List of all products in the order |
Ensure the variable names exactly match the keys in your website’s data layer code, including capitalization.
Step 4: Create the GA4 Purchase Event Tag
Now, create a new tag in GTM. Choose Google Analytics: GA4 Event as the tag type. Under Configuration Tag, select the GA4 Configuration tag you created earlier in Step 2. Use purchase as the Event Name, ensuring it matches GA4’s specifications.
Map each event parameter (like transaction_id, value, and currency) to its corresponding Data Layer Variable from Step 3. The transaction_id is especially important - it prevents GA4 from recording duplicate transactions if a user refreshes the confirmation page. For the value parameter, send the net price (excluding tax), and pass tax and shipping as separate parameters. After completing the event tag setup, assign a trigger to fire the purchase event.
Step 5: Set Up a Purchase Trigger
Finally, create a trigger in GTM by going to Triggers > New and selecting Custom Event as the trigger type. Set the event name to purchase, matching the event your website pushes to the data layer when a purchase is completed.
Most ecommerce platforms trigger this event on the order confirmation or thank-you page. To add an extra layer of control, you can create a Page View trigger that fires only when the URL includes "/order-confirmation" or "/thank-you". Attach this trigger to your purchase event tag and publish the GTM container.
Testing and Verifying the GA4 Purchase Event
After publishing your GTM container, it’s time to test whether the purchase event fires correctly and sends accurate data to GA4. This step ensures everything is working as expected before real customers start making purchases. Luckily, GA4 offers several ways to validate your setup.
Using GTM Preview Mode
Start by clicking Preview in GTM to open Tag Assistant and connect it to your website. This brings up a debug console that tracks tags, triggers, and variables as you navigate your site. Perform a complete test transaction and check the summary sidebar for the purchase event. Your GA4 Purchase Event tag should appear under Tags Fired. Click the tag to inspect the Values Sent and confirm that parameters like transaction_id, value, and currency are populated correctly.
Always use a unique transaction_id for every test purchase. GA4 only records the first purchase for a specific ID and ignores duplicates to prevent double-counting. If you reuse an ID, the event might appear in GTM but will be rejected by GA4. Also, ensure numeric parameters (like revenue) are passed as numbers (e.g., 30.03 instead of "$30.03") to avoid losing data. Once everything looks good here, move on to GA4 DebugView.
Validating in GA4 DebugView
DebugView gives you a near real-time stream of events, skipping the usual 24–48 hour processing delay. When using GTM Preview Mode, DebugView activates automatically by adding the _dbg=1 parameter to requests. Go to Configure > DebugView in GA4 and complete another test purchase. Click the purchase event in the timeline to review its parameters, user properties, and items.
The Items tab is especially important - it shows product-level details like item_id, item_name, and quantity.
"The DebugView feature can only track a user's behavior when you are using Google Tag Manager's preview mode." - Plumfind
If nothing shows up in DebugView, open your browser’s DevTools, filter network requests for "collect", and confirm the _dbg=1 parameter is in the request URL. Also, check that Internal Traffic filters are set to "Testing" mode instead of "Active", as active filters can block debug data. Testing in an Incognito window or a browser profile without extensions can help rule out interference from ad blockers. Once DebugView confirms the data is correct, head to Real-Time reports for further checks.
Checking Real-Time Reports
After verifying the event in DebugView, go to Reports > Realtime in GA4 to see if the purchase shows up in the Events card. The purchase event should appear immediately as configured in GTM. Click on the purchase event to confirm that parameters like transaction_id, value, currency, tax, and shipping are displaying correctly. The items array should include product details like item_id, item_name, price, and quantity for each product.
Keep in mind that while Real-Time reports show immediate activity, it usually takes about 24 hours for purchase data to fully populate in standard GA4 reports, explorations, and the Data API.
Since the purchase event is automatically flagged as a key event (conversion) in GA4, it should also appear in the Conversions or Key Events card within the Real-Time view. If revenue metrics aren’t showing up, double-check that the currency parameter uses the correct 3-letter ISO 4217 format (e.g., "USD") and is enclosed in quotation marks.
Conclusion
Final Thoughts on GA4 Purchase Event Setup
Getting the GA4 purchase event set up properly is a game-changer for any e-commerce business aiming to make informed marketing decisions. This event connects your marketing efforts directly to revenue, helps identify the most profitable channels, and showcases your best-performing products. As Graphed aptly states, "Tracking purchases is a foundational step in building a data-driven business".
In GA4, the purchase event is automatically flagged as a key event, ensuring it gets the attention it deserves in performance reports. But it’s not just about tracking revenue. It also provides insights into customer behavior, such as distinguishing between new and repeat buyers, measuring the success of promotions, and evaluating product-level performance. For those looking to go further, server-side tagging can even enable tracking profit margins instead of just gross revenue, offering a clearer picture of campaign ROI.
Once your purchase event is fully optimized, it’s time to think about enhancing your overall e-commerce tracking strategy.
Next Steps
After confirming your purchase event is working as intended, it’s a good idea to implement additional events to map out the entire e-commerce funnel. Events like view_item, add_to_cart, and begin_checkout can help pinpoint where potential customers are dropping off. To dig deeper, consider adding events like view_promotion, select_promotion, and refund to measure the impact of banners, discounts, and net revenue.
For more advanced analyses, exporting your GA4 data to BigQuery or leveraging the GA4 Data API can help you create custom dashboards tailored to your business needs. If you’re exploring other analytics tools to complement your GA4 setup, the Marketing Analytics Tools Directory is a great resource for finding top marketing tools, data solutions, and services to take your strategy even further.
FAQs
What should I do if purchases show in GTM but not in GA4?
If purchases are showing up in Google Tag Manager (GTM) but not in Google Analytics 4 (GA4), there are a few things to check. First, ensure the purchase event is properly set up with all the required parameters, such as value and currency, since these are crucial for tracking revenue accurately.
Next, confirm that the GA4 property is receiving the event. Double-check your tag and trigger configurations in GTM to make sure everything aligns. Finally, use the GA4 DebugView to verify that the event is actually being sent and processed. Sometimes, misconfigured tags or even slight delays can cause this kind of issue.
How do I prevent duplicate purchases when users refresh the thank-you page?
To avoid duplicate purchase tracking in GA4, use transaction ID deduplication. Assign a unique ID, like an order confirmation number, to each purchase event. GA4 automatically detects duplicate IDs and prevents them from being recorded as separate purchases.
Additionally, make sure the purchase event is triggered only once. Decide whether to implement it through Google Tag Manager (GTM) or directly in your website's code - never both. Use the GA4 DebugView to test your configuration and verify everything is working as intended.
What are the required and recommended purchase parameters in GA4?
In GA4, two required parameters must be included for the purchase event:
value: This represents the total purchase amount.currency: This specifies the transaction currency.
These parameters are critical for tracking revenue accurately.
Additionally, there are recommended parameters that, while not mandatory, can significantly improve the depth of your data:
items: Provides details about the products purchased.transaction_id: Helps uniquely identify each transaction.user_id: Tracks individual users for more detailed analysis.
Including these optional parameters allows for more granular insights into your transactions and user behavior.